Getting Started
Welcome to the Augment Web SDK. This document is designed to help you seamlessly provide product visualization in 3D and in augmented reality on your website.
Installation
The Augment Web SDK for JavaScript can be installed by simply including a short piece of regular JavaScript into your HTML. This will asynchronously load the SDK into your pages so that it does not block the loading of other elements on your page.
Integration and Security
When the SDK is instantiated, it will automatically check that the integration, identified by the ID and Key in the snippet (see ‘Snippet Section’), is authorized and that the domain on which the SDK is running is among the authorized domains. This mechanism is in place to stop the use of credentials in another domain by intruders trying to access our service on behalf of our customers.
Product Catalogs
When the integration is fully authorized, it will give you access to the associated catalog. The catalog is a collection of product to be queried for product visualization in 3D or in augmented reality.
To help you test our SDK, the credentials in the snippet provided in the ‘Snippet Section’ is associated to a demo integration that will give you access to a demo catalog containing some demo references. Here are its products:
| Identifier | Brand | Name |
|---|---|---|
| 81 | Samsung | TV |
| 82 | Lenovo | Yoga 900 |
| 83 | Samsung | Washer |
| 84 | Whirlpool | Fridge |
| 86 | FINLANDEK | Couch |
| 89 | Restoration Hardware | Chair |
| 90 | Restoration Hardware | Table |
| 91 | Target | Chair |
| 92 | Target | Outdoor Chair |
| 93 | Bed Bath | Table |
| 94 | Bed Bath | Curtains |
| 95 | Sun Lounger | Frontgate |
| 96 | Ballard | Table |
| 97 | Adidas | Shoe |
| 98 | Nintendo | Switch |
* GTIN attributes are highly recommended as they are used to match products to our existing Product Hub and can automatically provide you with 3D representations of your products.
We will, of course, set up your own integration associated to your own catalog of products and provide your own credentials.
Snippet
Asynchronously load the SDK using our loading snippet with your authentication credentials:
// These are demo credentials linked to the demo catalog below
<script data-augment-config='{ "id": "e83d39f812a0eaf25b81fcd6d671aa2d9a4c803e834ef34cc8d87da24c068fd2", "key": "1c6f1a10156efc13625ce1a290ec9d5da71ac80900de11acd8ef6fd89973d19f" }' src="https://cdn.augment.com/web-sdk/1.2/snippet.js"></script>
You should insert it directly before the closing </body> tag on each page you’d like for it to load.
The snippet will check for the existing version of the Augment SDK for JavaScript on the current page, initialize a function queue to be executed once the JavaScript has loaded, and load the JavaScript asynchronously from Augment’s CDN.
Web 3D Visualization
Overview
Augment’ Web 3D Viewer allows your website visitors to see and manipulate your products in 3D, turning products around it and zoom in to see its details.
Our Web 3D Viewer can be embedded anywhere on a product page and will be displayed upon clicking a call-to-action button. When the 3D Viewer is fully generated it will display the product and respond to visitor gestures so that the product can be manipulated and viewed from all angles.
Guide
Initialization
Our Web SDK provides a set of methods to embed the Web 3D Viewer into your website.
3D Viewer Container
The Web 3D Viewer can be embbeded into any div of your page and when generated, the SDK will inject the 3D Viewer into the defined div. All the content of this div is considered part of the 3D Viewer : you should avoid setting content inside as it is not guaranteed to be kept as provided. Make sure that the div has the proper dimension by defining appropriate css rules or dom attributes:
<div id="web-viewer-container" style="width: 640px; height: 480px;"></div>
- You may choose to hide the parent div by default and display it only once it is certain that the 3D visualization is available for that requested product.
<div id="web-viewer-container" style="display: none;"></div>
Caution: The 3D Viewer uses css rules to set the display of its different elements. Take care not to define too generic css rules as they may override those of the 3D Viewer.
Call-to-action button
You may choose to directly display the 3D Viewer container or display it later. If no 3D visualization is available, the container will remain unchanged. To show it later you may implement a call-to-action button which will be displayed if the 3D visualization is available for the requested product and which will then display the 3D Viewer when clicking on it. As a simple button it may be customized to match the look and feel of your page:
<button id="web-viewer-button" onclick="displayWebViewer()" style="display: none" >View in 3D</button>
-
The button is hidden by default to ensure that it will not be displayed when there is no 3D visualization available for that requested product.
-
The onclick attribute is here to display the 3D Viewer so ensure that the associated function is defined (see ‘3D Viewer Generation Section’)
Localization
Language
The 3D Viewer provides English and French localizations for its interface (warning messages, tooltips, help…). You may add other languages or override the provided ones by filling in the optional configuration object accepted by the function which generates the 3D Viewer.
To set the language used by the 3D Viewer, specify the parameter ‘activeLanguage’ (see example below) in the localization object. The parameter accepts codes as defined in BCP47 (for instance, ‘en-us’ for US English or ‘en’ for no regional English)
If no active language is defined in the configuration or there is no configuration at all, the language currently active in the browser will be used.
  viewerResponse.generateWebViewer(document.getElementById('web-viewer-container'), {
    localization : {
      activeLanguage: 'fr'
    }
  }, ...);
You can add a language support with or without regional versions. For instance, you may add the ‘es’ definition to support Spanish or choose to add the ‘es-es’ and ‘es-co’ definitions to provide the Castilian and Colombian Spanish versions.
Here are the rules applied to localize an item:
- If the item is defined in the target specific language (‘es-co’), this definition is used
- Else, if the item is defined in the main language (‘es’) , this definition is used
- Else, the fallback English definition is used
Caution: If you only provide one or more specific regional languages (‘es-co’, ‘es-es’) without defining the associated main language (‘es’), the main language will be filled with the last regional language found. Thus you should always define the main language (‘es’) and override the items which are different in the regional versions (‘es-co’) to be sure to have the required result. If some definitions are missing or a language code is malformed, non-blocking errors will be thrown to point out what you should fix.
  viewerResponse.generateWebViewer(document.getElementById('web-viewer-container'), {
    localization : {
      activeLanguage: 'es',
      languages: {
        es: {
          BOTTOM_BAR_BUTTON_HELP_TOOLTIP: "Ayuda",
          BOTTOM_BAR_BUTTON_DIMENSIONS_TOOLTIP: "Mostrar dimensiones",
          ...
        }
      }
    }
  }, ...);
- Here is the complete definition of the interface localization for English:
  {
    WARNING_MISSING_WEBGL_SUPPORT: "Your graphics card or browser does not seem to support <a href=\"http://khronos.org/webgl/wiki/Getting_a_WebGL_Implementation\" style=\"color:#000\">WebGL</a>.<br />Find out how to get it <a href=\"http://get.webgl.org/\" style=\"color:#000\">here</a>",
    WARNING_OBSOLETE_IE_VERSION: "You seem to be using a version of Microsoft Internet Explorer prior to 11.<br />To benefit from all the features provided by this viewer and to have a good experience, please update your browser to the latest available version or use another modern browser.<br />Find out how to get it <a href=\"https://support.microsoft.com/\" style=\"color:#000\">here</a>.",
    PROGRESS_BAR_TITLE: "Loading 3D model...",
    BOTTOM_BAR_BUTTON_HELP_TOOLTIP: "Help",
    BOTTOM_BAR_BUTTON_DIMENSIONS_TOOLTIP: "Show Dimensions",
    BOTTOM_BAR_BUTTON_FULLSCREEN_TOOLTIP: "Fullscreen",
    SLIDER_ZOOM_TOOLTIP: "Zoom",
    INSTRUCTIONS_GESTURES_MAIN_TITLE: "HOW TO GET STARTED",
    INSTRUCTIONS_GESTURES_ROTATE_SECTION_TITLE: "ROTATE",
    INSTRUCTIONS_GESTURES_ROTATE_SECTION_DESCRIPTION: "Left click or\nMove One finger.",
    INSTRUCTIONS_GESTURES_ZOOM_SECTION_TITLE: "ZOOM",
    INSTRUCTIONS_GESTURES_ZOOM_SECTION_DESCRIPTION: "Scroll anywhere or\nPinch with Two fingers.",
    INSTRUCTIONS_GESTURES_PAN_SECTION_TITLE: "PAN",
    INSTRUCTIONS_GESTURES_PAN_SECTION_DESCRIPTION: "Right click or\nMove Two fingers."
  };
Measurement system
The 3D Viewer provides Metric (m) and Imperial (in) system to display dimensions of 3D model.
You may provide the desired measurement system in the optional configuration object accepted by the function which generates the 3D Viewer.
To set the measurement system used by the 3D Viewer, specify the parameter ‘measurementSystem’ (see example below) in the localization object.The parameter accepts ‘metric’ or ‘imperial’ values.
If no measurement system is defined in the configuration or there is no configuration at all, the measurement system is computed from the browser language.
  viewerResponse.generateWebViewer(document.getElementById('web-viewer-container'), {
    localization : {
      measurementSystem: 'metric'
    }
  }, ...);
3D Viewer Generation
The following code will:
- Check if a product exists in the catalog using the identifier given as a parameter
- Check if product has a 3D model associated
- Display the button to generate the 3D Viewer if there are no errors
- Create the Web 3D Viewer once the button is clicked
<button id="web-viewer-button" onclick="displayWebViewer()" style="display: none" >View in 3D</button>
<div id="web-viewer-container"></div>
var viewerResponse;

function displayWebViewerButton() {
  document.getElementById('web-viewer-button').style.display = 'block';
}

function displayWebViewer() {
  // Add a configuration object if needed
  var configuration =  {};
  // Generates the viewer in the defined container
  // Caution: Makes sure that the container has a non-zero size defined by css rules or dom attributes
  viewerResponse.generateWebViewer(document.getElementById('web-viewer-container'), configuration, function() {
    // The code here will be called when the 3D Viewer is
    // fully ready
  });
  // Displays the 3D Viewer to the visitor
  document.getElementById('web-viewer-canvas').style.display = 'block';
}

augment.initForProduct(
  {
    gtin: {
    // Global Trade Item Number:
    // GTIN-13, EAN-13
    // GTIN-12, UPC-A
    // GTIN-8, EAN-8
    // UPC-E
    type: 'GTIN-13',
    value: '4054568898766'
    },
    brand: 'Lenovo',
    name: 'Yoga 900',
    identifier: '82',
    price: {
      value: 399.99,
      // ISO 4217:
      // 'EUR', 'USD', 'JPY', 'CAD', 'RUB', 'GBP', ...
      currency: 'EUR'
    },
    categoryPath: ['Computers', 'Laptops'],
    pageUrl: 'http://www.example.com/82.html'
  }, function(error, response) {
    // Checks for errors to avoid displaying the button in the following
    // cases:
    // - The requested product doesn't exist
    // - The requested product has no 3D model
    // - Something went wrong (internet connection, ...)
    if (!error) {
      // Checks if the product exist and if a 3D model is associated
      if (response['product'] && response['model3d']) {
        // Stores the response to generate the Viewer when the visitor clicks
        // on the call-to-action button
        viewerResponse = response;
        // Displays the call-to-action button
        displayWebViewerButton();
      }
    }
  }
);
Example
Mobile AR Visualization
Overview
AR visualization requires a mobile application on a mobile device. Augment’s Web SDK provides a set of methods to redirect your website visitors to AR visualization in a mobile application even if the visitors do not have the application installed yet.
Transitioning website visitors to a mobile application content often results in a low conversion rate because of the friction involved in the multi-step process. But by using Augment’s Web SDK, you can easily and effectively transition your website visitors to install and open the application that handle the AR visualization from all platforms (desktop, iOS, Android).
The redirection workflow starts redirects the visitor to the correct content regardless of whether it is a desktop or mobile visitor.
Desktop visitors

Desktop visitors are redirected to a fallback page, where they are prompted to switch to the mobile platform by either scanning a QR code or sending a link by SMS.
Mobile visitors
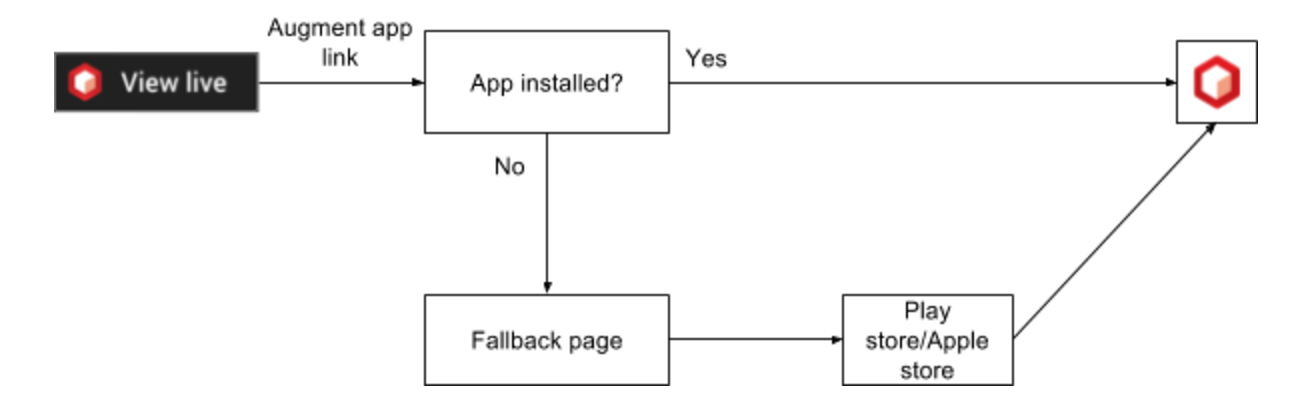
Mobile visitors are redirected to a mobile fallback page that presents a call-to-action button, from which visitors will be redirected to the proper app store.
Fallback pages
Fallback pages are used to direct both desktop and mobile visitors that do not yet have the Augment application installed. The fallback page presents the Augment application and leads the visitor into the installation process.
By default, visitors are redirected to Augment’s fallback page, but this can easily be overridden to host your own branded fallback pages (see the Advanced section).
Guide
Initialization
Call-to-action button
The call-to-action button will be displayed if AR visualization is available for the requested product. The button’s link is generated by the SDK and the button’s look can be customized to match the style of your page:
<a id="action-view-at-home" href="" style="display: none" >View at home</a>
- The button is hidden by default so that it does not display when there is no AR visualization available for the requested product.
Application Link Generation
The following code will check if:
- A product exists in the catalog using the identifier given as a parameter
- A 3D representation exists for that product
If there are no errors, the code will generate an application link to redirect the visitor into AR visualization within the mobile application:
augment.initForProduct(
  {
    gtin: {
      // Global Trade Item Number:
      // GTIN-13, EAN-13
      // GTIN-12, UPC-A
      // GTIN-8, EAN-8
      // UPC-E
      type: 'GTIN-13',
      value: '4054568898766'
    },
    brand: 'Lenovo',
    name: 'Yoga 900',
    identifier: '82',
    price: {
      value: 399.99,
      // ISO 4217:
      // 'EUR', 'USD', 'JPY', 'CAD', 'RUB', 'GBP', ...
      currency: 'EUR'
    },
    categoryPath: ['Computers', 'Laptops'],
    pageUrl: 'http://www.example.com/82.html'
  },
  function(error, response) {
    // Checks for errors to avoid displaying the button in the following
    // cases:
    // - The requested product doesn't exist
    // - The requested product has no 3D representation
    // - Something went wrong (internet connection, ...)
    if (!error) {
      // Generates the application link
      response.applicationLink(function (error, result) {
        var button = document.getElementById('action-view-at-home');
        // Inject this URL into the call-to-action button
        button.href = result.url;
        // Displays the button
        button.style.display = 'block'
      });
    }
  }
);
Advanced
This ‘Advanced Section’ will review the cases where it is possible to override the SDK’s default behavior.
Fallback Pages
Application Link Generation
In order to redirect your visitors to fallback pages hosted on your own website, instead of those on Augment’s, you will need to override the URLs in the initialization of the deep linking module with the following:
augment.initForProduct(
  {
    gtin: {
      type: 'GTIN-13',
      value: '4054568898766'
    },
    brand: 'Lenovo',
    name: 'Yoga 900',
    identifier: '82',
    price: {
      value: 399.99,
      currency: 'EUR'
    },
    categoryPath: ['Computers', 'Laptops'],
    pageUrl: 'http://www.example.com/82.html'
  },
  {
    desktopFallbackURL: 'http://www.example.com/desktop_fallback',
    mobileFallbackURL: 'http://www.example.com/mobile_fallback'
  }
, callback(error, response));
Fallback Page Content
Desktop and mobile fallback pages can be the same URL if your website is responsive, but they should display different content.
Desktop
On desktop fallback pages, you should provide a QR Code and/or SMS mechanism to invite the visitor to switch to a mobile device.
Use the generateQRCode method below to display a QRCode on the desktop page:
augment.initOnFallbackPage(function(error, response) {
  if (!error) {
    response.generateQRCode(domElement, options: { size: 180 });
  }
});
The element argument is the dom element where we will insert the QRCode.
Use the sendSMS method below to send the link through an SMS message:
augment.initOnFallbackPage(function(error, response) {
  if (!error) {
    response.sendSMS(phoneNumber, function(error) {});
  }
});
Mobile
On mobile fallback pages, you should provide an Augment button that will open the application or redirect the user to the proper app store. This is done using the applicationLink method below just like in the ‘Guide Section’:
augment.initOnFallbackPage(function(error, response) {
  if (!error) {
    response.applicationLink(function(error, result) {
      result.url; // Inject this URL into an Augment button
    });
  }
});
Callback URL
The callbackURL option can be used to redirect the user to back to the product page after he visualizes the product in augmented reality. This way, the user can continue with the purchase workflow.
augment.initForProduct(
  {
    gtin: {
      type: 'GTIN-13',
      value: '4054568898766'
    },
    brand: 'Addidas',
    name: 'Stan Smith',
    identifier: '82',
    price: {
      value: 98.99,
      currency: 'EUR'
    },
    categoryPath: ['Shoes'],
    pageUrl: 'http://www.myshop.com/products/super-shoes'
  }
, {
    callbackURL: 'http://www.myshop.com/products/super-shoes'
  }
, callback(error, response));
Feedback and Contact
We are always interested in your feedback and suggestions for how we can improve this documentation. Please email us at support@augment.com.